Installations
Back Installation
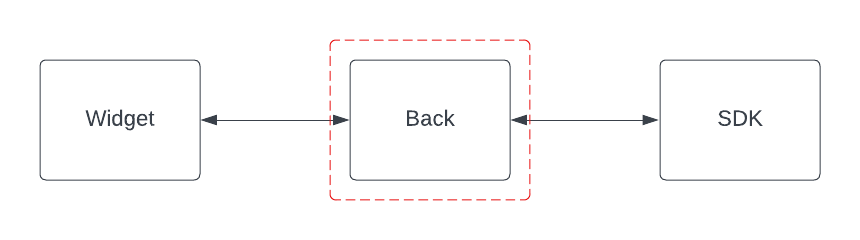
This is ChatFAQ’s core component, the orchestrator of ChatGPT. It manages all the widgets and SDks connections, session storage, datasets and models registration, FSM registration, FSM executions (intended only for simple FSMs), etc…
Setting it up Locally
Prerequisites
Make sure the next list of packages are installed on your system:
Python 3.10
python3.10-dev
python3.10-distutils
PostgreSQL
gdal-bin
poetry
Installation
Local build
Set Up:
Install project dependencies:
poetry install
Create a “chatfaq” database in PostgreSQL
sudo -u postgres psql -c "CREATE DATABASE chatfaq"
Create a “chatfaq” user in PostgreSQL
sudo -u postgres psql -c "CREATE user chatfaq WITH encrypted password 'chatfaq';"
Give the newly created user the necessary privileges
sudo -u postgres psql -c "grant all privileges on database chatfaq to chatfaq;"
Apply django migrations
poetry run ./manage.py migrate
Apply fixtures
make apply_fixtures
Create a superuser
./manage.py createsuperuser --rpc_group 1
When creating the superuser notice that we are passing the --rpc_group 1 flag. This is critical to be able to create an RPC Server with this same user later on.
Now you can access the Django admin panel at http://localhost:8000/back/admin/ and login with the superuser credentials, from there you can CRUD all the relevant models.
Run
First of all, create a .env file with the needed variables set. You can see an example of those on .env_example file. Next you can see the explanation of each variable:
DEBUG: Set to “yes” to enable debug mode
SECRET_KEY: Server secret key. This is used to provide cryptographic signing, and should be set to a unique, unpredictable value.
DATABASE_URL: Database connection URL. This is the URL that will be used to connect to the database. It should be in the following format: postgres://USER:PASSWORD@HOST:PORT/NAME
BASE_URL: Base URL of the server. This is the URL that will be used to connect to the server. It should be in the following format: http://HOST:PORT
AWS_ACCESS_KEY_ID + AWS_SECRET_ACCESS_KEY + AWS_STORAGE_BUCKET_NAME + DO_REGION + STORAGES_MODE + STORAGE_MAKE_FILES_PUBLIC: These variables are used to configure the storage backend. If you want to use AWS S3, you should set STORAGES_MODE to “s3” and set the other variables accordingly. If you want to use Digital Ocean Spaces, you should set STORAGES_MODE to “spaces” and set the other variables accordingly. If you want to use the local filesystem, you should set STORAGES_MODE to “local”.
TG_TOKEN, WHATSAPP_TOKEN, SIGNAL_TOKEN, FB_TOKEN: These variables are used to configure the messaging platforms. You should set the token of the platforms you want to use. If you don’t want to use a platform (ie: you are using our Widget solution), you can leave its token empty.
Run the server
make run
Docker
Alternatively you can simply run the server using docker.
Build
docker build -t chatfaq-back .
Run
docker run -p 8000:8000 chatfaq-back
Usage
Useful Endpoints
Admin: http://localhost:8000/back/admin/
Auth Token Generation: http://localhost:8000/back/api/login/
Swagger Docs: http://localhost:8000/back/api/schema/swagger-ui/
Redoc Docs: http://localhost:8000/back/api/schema/redoc/
SDK Installation
For those chatbots with complex Finite State Machine (FSM) behaviours, you will probably want to run them on a separate process, that is what for the SDK is made for. Its primary function is to execute the FSM’s computations (transition’s conditions and states) by running Remote Procedure Call (RPC) server that listen to the back-end requests.
Prerequisites
Make sure the next list of packages are installed on your system:
Python 3.10
python3.10-dev
python3.10-distutils
poetry
Installation
PYPI
poetry add chatfaq-sdk
Local build
Set Up:
Install project dependencies:
poetry install
Run
First of all, create a .env file with the needed variables set. You can see an example of those on .env_example file. Next you can see the explanation of each variable:
CHATFAQ_RETRIEVAL_HTTP: The address for the HTTP of the back-end server.
CHATFAQ_BACKEND_WS: The address for the WS of the back-end server.
CHATFAQ_TOKEN: The token to authenticate with the back-end server. You can retrieve the auth token from the backend server:
curl -X POST -u username:password http://localhost:8000/back/api/login/
Run the example:
make run_example
This will run the example FSM that is located in ./examples/model_example/init.py file. You can modify this file to test your own FSMs.
Docker
Alternatively you can simply run the server using docker.
Build
docker build -t chatfaq-sdk .
Run
docker run chatfaq-sdk
Widget installation
We built for you a custom front-end solution just so you can talk with your chatbot from the browser using an app you own. Although you can also connect any other message platform as such WhatsApp, Telegram, Signal, Facebook messenger, etc… ChatFAQ supports them all and if it doesn’t it can easily be extended to do so.
Prerequisites
Make sure the next list of packages are installed on your system:
npm
node v19.6.0
Installation
NPM
npm install chatfaq-widget
UNPKG
<script src="unpkg.com/chatfaq-widget/dist/widget-loader.min.esm"></script>
Local build
Set Up:
Install project dependencies:
npm i
Run
First of all, create a .env file with the needed variables set. You can see an example of those on .env_example file. Next you can see the explanation of each variable:
CHATFAQ_BACKEND_API: The address for the HTTP of the back-end server.
CHATFAQ_BACKEND_WS: The address for the WS of the back-end server.
Run the example:
npm run dev
This will run a node server which will serve an empty webpage with just the Widget integrated on it, if you navigate to http://localhost:3000